Windows: Extend screen vertically
When
we connect our laptop to an external monitor, we are able to define the
position of each screen.
Usually the screens are put horizontally side-by-side; I prefer to put the them
vertically. Like this I make less eye strain and muscle strain, and I am able
to easily extend long documents or compare different windows.
0- Connect an external monitor to a laptop through
a. Docking
Station ![]() ,
,
![]()
b. VGA
port ![]()
c. HDMI
port ![]()
NOTE: HDMI does not like to be connected when the equipment is on.
It prefers to be connected with equipment off.
d. DisplayPort
![]()
1- To choose the right pairing of the screens press the following key shortcut:
a. in
Windows 7 or Windows 10, keys Windows + P ![]()
b. Laptops usually have a special key shortcut, like
Fn
+ F8 or fn + F4. On mine is fn + ![]()
2- 4 options appear, on the middle of the screen, or on the side :
|
|
|
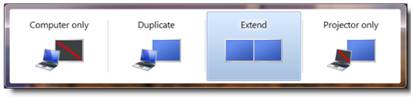
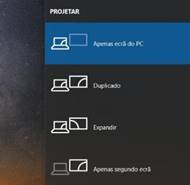
a. Image only on the laptop, forget the external
b. Duplicate: same image on both screens (laptop and external)
c. Extend: have a larger screen area, with the 2 screens
d. Project: only external monitor
Select one of the options by clicking it with the mouse, or repeatedly pressing the key shortcut until the option is selected.
3- Extend
screen is my favorite. Lets see how to define
it:
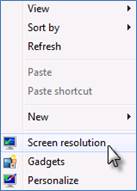
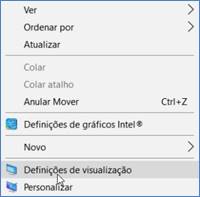
Right-click the mouse button on any free area of your Desktop, and
choose:
(Win 7) Screen Resolution or (Win 10) Appearance Display
4- On
the window there are already 2 screens.
Note: If you cannot see the 2 screens, click on Detect. If that does not
work, trey to reboot the computer and start from step 1.

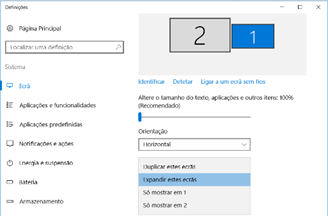
At the field Multiple displays, chose from the drop-down list Extend these displays.
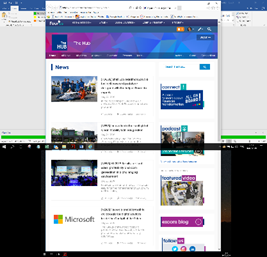
5- Here we can choose the position of the screens. It is not mandatory they stay side-by-side. I like to have them one below the other.
But first we need to
know which is screen 1 and screen 2 before moving them.
Click on Identify. A big number shows on each screen, and on the window.
Below the effect with screen 2.
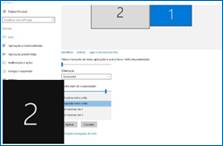
We know now that screen 2 is the biggest one, it is in screen 2 where the
window Display appearance is and the screen is at the moment on the left
side.
6- We then drag the blue rectangle of screen 1 to the position we want.
|
We can choose any position, even an insane one, diagonally!! ; -)
|
But I like to put one on top of the other, and also physically.
|
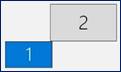
At the end click OK.
Its done. Next time you click the key shortcut, the screens will be positioned
automatically.
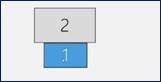
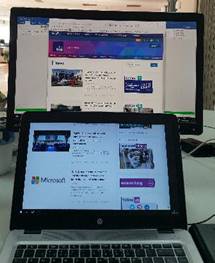
7- Check out the result how I work on my spot.
|
Image of the 2 screens, one on top
of the other |
|
. . : Topo : . .